Mobile ODIN is basically an Android application equivalent to ODIN for PC. That's right. It's an application you can install on your Android device to flash firmwares and kernels. What makes it easier to use than ODIN? For starters, Mobile ODIN automatically places files where they're supposed to be when you open them with the app. No need to worry about placing files incorrectly which, by the way, could seriously screw up your phone. It's really easy to use as long as you have a compatible "flashable" file. In this post, I will teach you two things - how to flash firmwares and how to flash kernels on your device using Mobile ODIN.

Grant SuperUser access when prompted.
Choose the firmware you unzipped from Step 1. You will be informed about the partitions that Mobile ODIN automatically set for you. Select "OK".


That is, if you want to root your firmware during installation. The boxes that you can check are as follows:

This will perform a "clean wipe" which is often necessary for installing firmwares.
Before we begin, let me give you reasons why I prefer installing firmwares and kernels using Mobile ODIN.
- Unlike ODIN, Mobile ODIN doesn't leave you with that nasty yellow triangle during boot image (which fortunately you can remove using Triangle Away - no need for USB jig!). I don't know about your device but from what I know, the yellow triangle appears in Samsung devices when flashing custom ROMs and kernels.
- It's really simple to use. As I mentioned earlier, Mobile ODIN is smart enough to automatically set partitions when you open a file. No more worries!
- It's convenient. No need to power up your PC. Installing firmwares and kernels is within hands-reach and with much less clicks than flashing with custom recovery. Need I say more?
Compatible Devices
- Samsung Galaxy S GT-i9000
- Samsung Galaxy S2 GT-i9100
- Samsung Galaxy Note GT-N7000
- Samsung Galaxy S3 GT-i9300
- and more!
Please refer to this XDA thread by Chainfire to see the complete list of supported devices.
Prerequisites
- Rooted device
- Mobile ODIN Pro [ Google Play Store ] or you can download the Lite version at this XDA thread. NOTE: The Lite version doesn't have EverRoot which automatically roots the phone after installing official firmware.
- At least 50 percent of battery life, just to be sure
- Nandroid back-up (again, just in case)
Reminders
- Flashable .zip files are not supported in Mobile ODIN.
- Only files for Kernel, System, Data, Cache, Param, Modem, and Hidden files are supported
- Mobile ODIN does not flash PIT, IBL/PBL, SBL, and EFS
- After flashing official firmware, you will only get SuperSU. You may need to flash a separate CF-Root kernel to gain CWM Recovery and CWM Manager. You can flash CF-Root using Mobile ODIN like me :)
HOW TO FLASH FIRMWARES USING MOBILE ODIN
Step 1: Download the firmware
It must be in .tar.md5 format which usually is the case with official firmware. If you have a .zip or .7z file, you can use ZArchiver (free at the Google Play Store) to unzip it directly on your phone. You should see the .tar.md5 file after. You can also unzip it on your computer and transfer the file to your internal/external SD card later.
 |
| XXLPX in .zip format |
 |
| XXLPX in .tar.md5 after unzip. I use ZArchiver, free at Google Play |
Step 2: Transfer the unzipped file to your device.
You can place it in your internal or external SD card. Personally, I set up a folder at the internal SD card titled "ROMs and Flashables" and segregate firmwares and kernels in different folders.
Step 3: Launch Mobile ODIN

Grant SuperUser access when prompted.
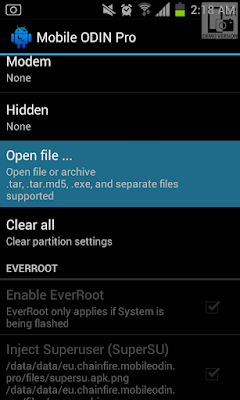
Step 4: Select "Open file ..."

Choose the firmware you unzipped from Step 1. You will be informed about the partitions that Mobile ODIN automatically set for you. Select "OK".

Selected a wrong file? No worries. Select "Clear all" to clear all partitions.


Step 5: Make sure EverRoot is ticked (Pro users only)

That is, if you want to root your firmware during installation. The boxes that you can check are as follows:
- Enable EverRoot
- Inject Superuser
- Inject Mobile ODIN
Otherwise, leave these boxes unticked.
Step 6: Select "Wipe data and cache" and "Wipe Dalvik cache"

This will perform a "clean wipe" which is often necessary for installing firmwares.
Step 7: Select "Flash firmware"
When asked if you should check the md5 signature, have it checked. This will make sure that the file you have is complete and not broken. After this step, your phone will automatically shut down and reboot to Mobile ODIN's custom Recovery Mode. The installation process will take place. Just sit back and wait for it to finish :)
HOW TO INSTALL KERNELS USING MOBILE ODIN
Step 1: Download the kernel
It must be in .tar format so you can flash it using Mobile ODIN. If you have a .zip file, try to unzip it and see if there's a .tar file inside.
Step 2: Transfer the unzipped file to your device.
You can place it in your internal or external SD card.
Grant SuperUser access when prompted.
Choose the firmware you unzipped from Step 1. You will be informed about the partitions that Mobile ODIN automatically set for you. Select "OK".
Step 3: Launch Mobile ODIN
Grant SuperUser access when prompted.
Step 4: Select "Open file ..."
Choose the firmware you unzipped from Step 1. You will be informed about the partitions that Mobile ODIN automatically set for you. Select "OK".
Step 5: Select "Flash firmware"
Afterwards, your phone will reboot to Recovery Mode for installation of the kernel. Wait for it to finish and your phone will automatically reboot. Congrats! You just flashed a kernel using Mobile ODIN.


Hi, this is the only place I have found info on Mobil Odin Pro and cfroot, good work!!
ReplyDeleteI flashed latest stock firmware with Mobil Odin Pro using everroot.
Works like charm but indeed lost cwm, so I'm trying to regain cwm.
So when flashing a cfroot you UNcheck
- Enable EverRoot
- Inject Superuser
- Inject Mobile ODIN
Just select the*.tar and flash.
@Anonymous^: That happened to me too! I lost CWM. Your tip is really useful for other readers who don't want to lose their CWM and that includes me haha. Thank you for sharing! I will keep your tip in mind.
ReplyDelete